
Transforming Ethereum data with dbt
In a previous post, we explored how to extract data from Ethereum using Airbyte. Now that we have our raw data sitting in a database, it’s time to start transforming it to meet our specific needs. In this particular case, we’ll be using dbt for these transformations.
If you’re new to dbt, this is a great starting point:
By following these steps, we are on our way to unlock the potential of dbt. Let’s dive in and see what we can do!
Creating our first dbt project
To streamline our deployment process in the future, we’ll be making use of Docker. This will allow us to easily manage our dbt environment and ensure that everything is running smoothly. Here’s how we’ll get started:
First, we’ll need to pull the correct dbt image by running the following command:
docker pull ghcr.io/dbt-labs/dbt-postgres
Once that’s done, we’ll need to create a skeleton to work with. To do this, we’ll run the Docker equivalent of the dbt init <project_name> command:
mkdir dbt_projects
mkdir dbt_projects/profiles
cd dbt_projects
docker run -it \
--platform linux/amd64 \
--network=host \
--mount type=bind,source=/Users/leodonethat/dbt_projects,target=/usr/app \
--mount type=bind,source=/Users/leodonethat/dbt_projects/profiles/,target=/root/.dbt/ \
ghcr.io/dbt-labs/dbt-postgres \
init dbt_ethereum
10:47:01  Running with dbt=1.2.3
Which database would you like to use?
[1] postgres

(Don't see the one you want? https://docs.getdbt.com/docs/available-adapters)

Enter a number: 1
10:47:03  Profile dbt_ethereum written to /root/.dbt/profiles.yml using target's sample configuration. Once updated, you'll be able to start developing with dbt.
10:47:03
Your new dbt project "dbt_ethereum" was created!

For more information on how to configure the profiles.yml file,
please consult the dbt documentation here:

  https://docs.getdbt.com/docs/configure-your-profile

One more thing:

Need help? Don't hesitate to reach out to us via GitHub issues or on Slack:

  https://community.getdbt.com/

Happy modeling!
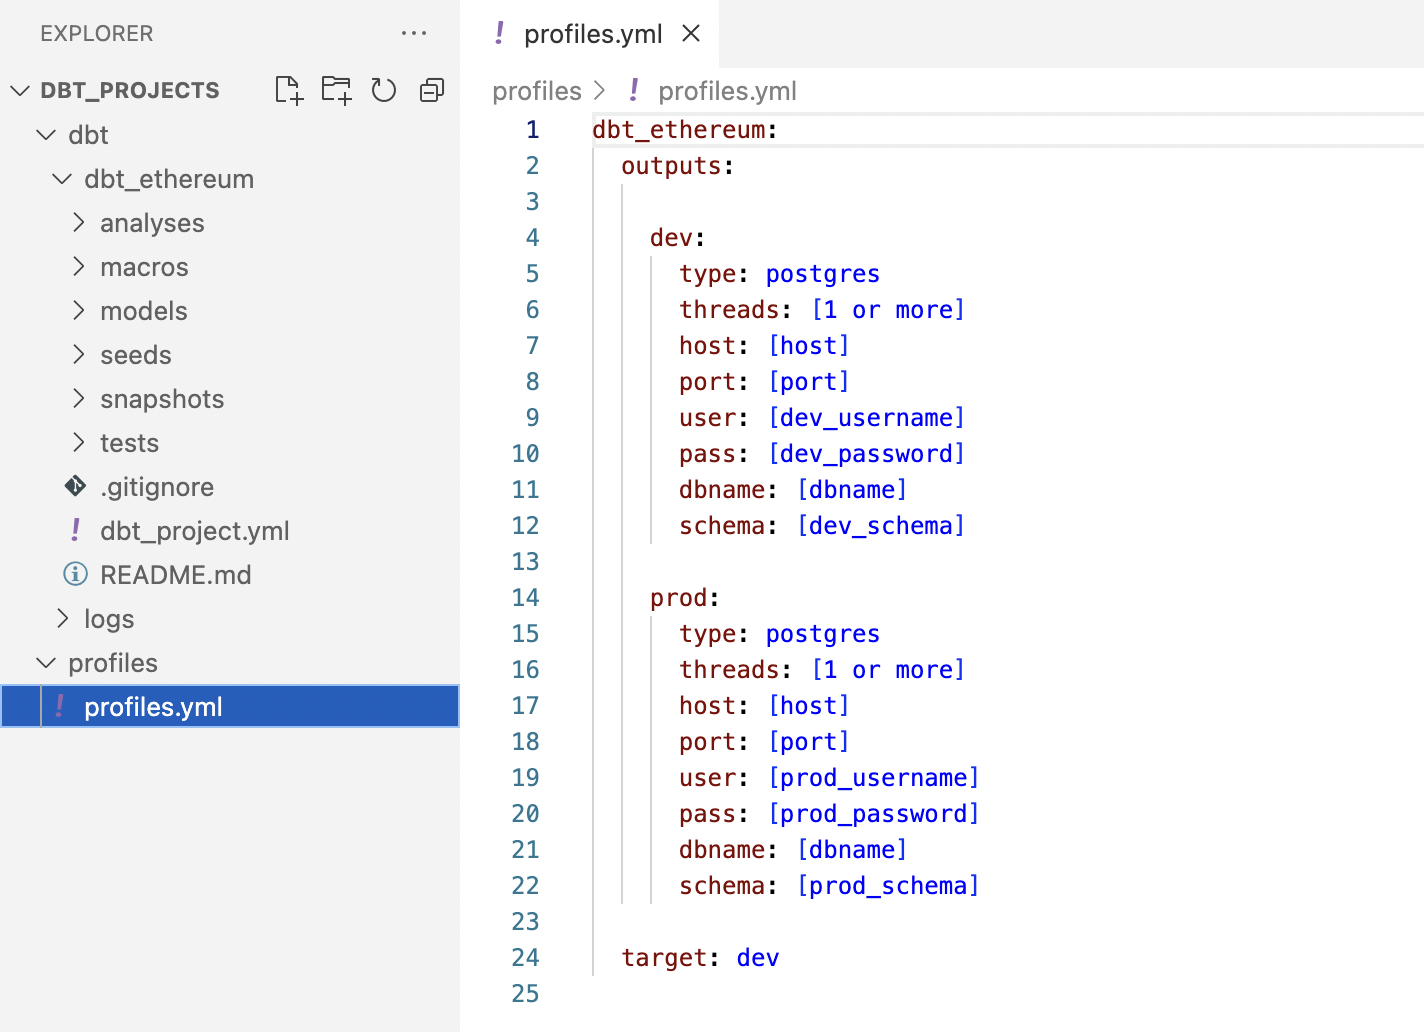
Next, we’ll update the profiles.yml file with the credentials for our local Postgres database.
dbt-ethereum:
  target: dev
  outputs:
    dev:
      type: postgres
      threads: 1
      host: 127.0.0.1
      port: 5432
      user: postgres
      pass: postgres
      dbname: eth
      schema: dbt
Finally, we’ll want to take a look at the dbt_project.yml file in the newly created dbt_ethereum directory. This file can be updated to suit our specific needs and requirements.
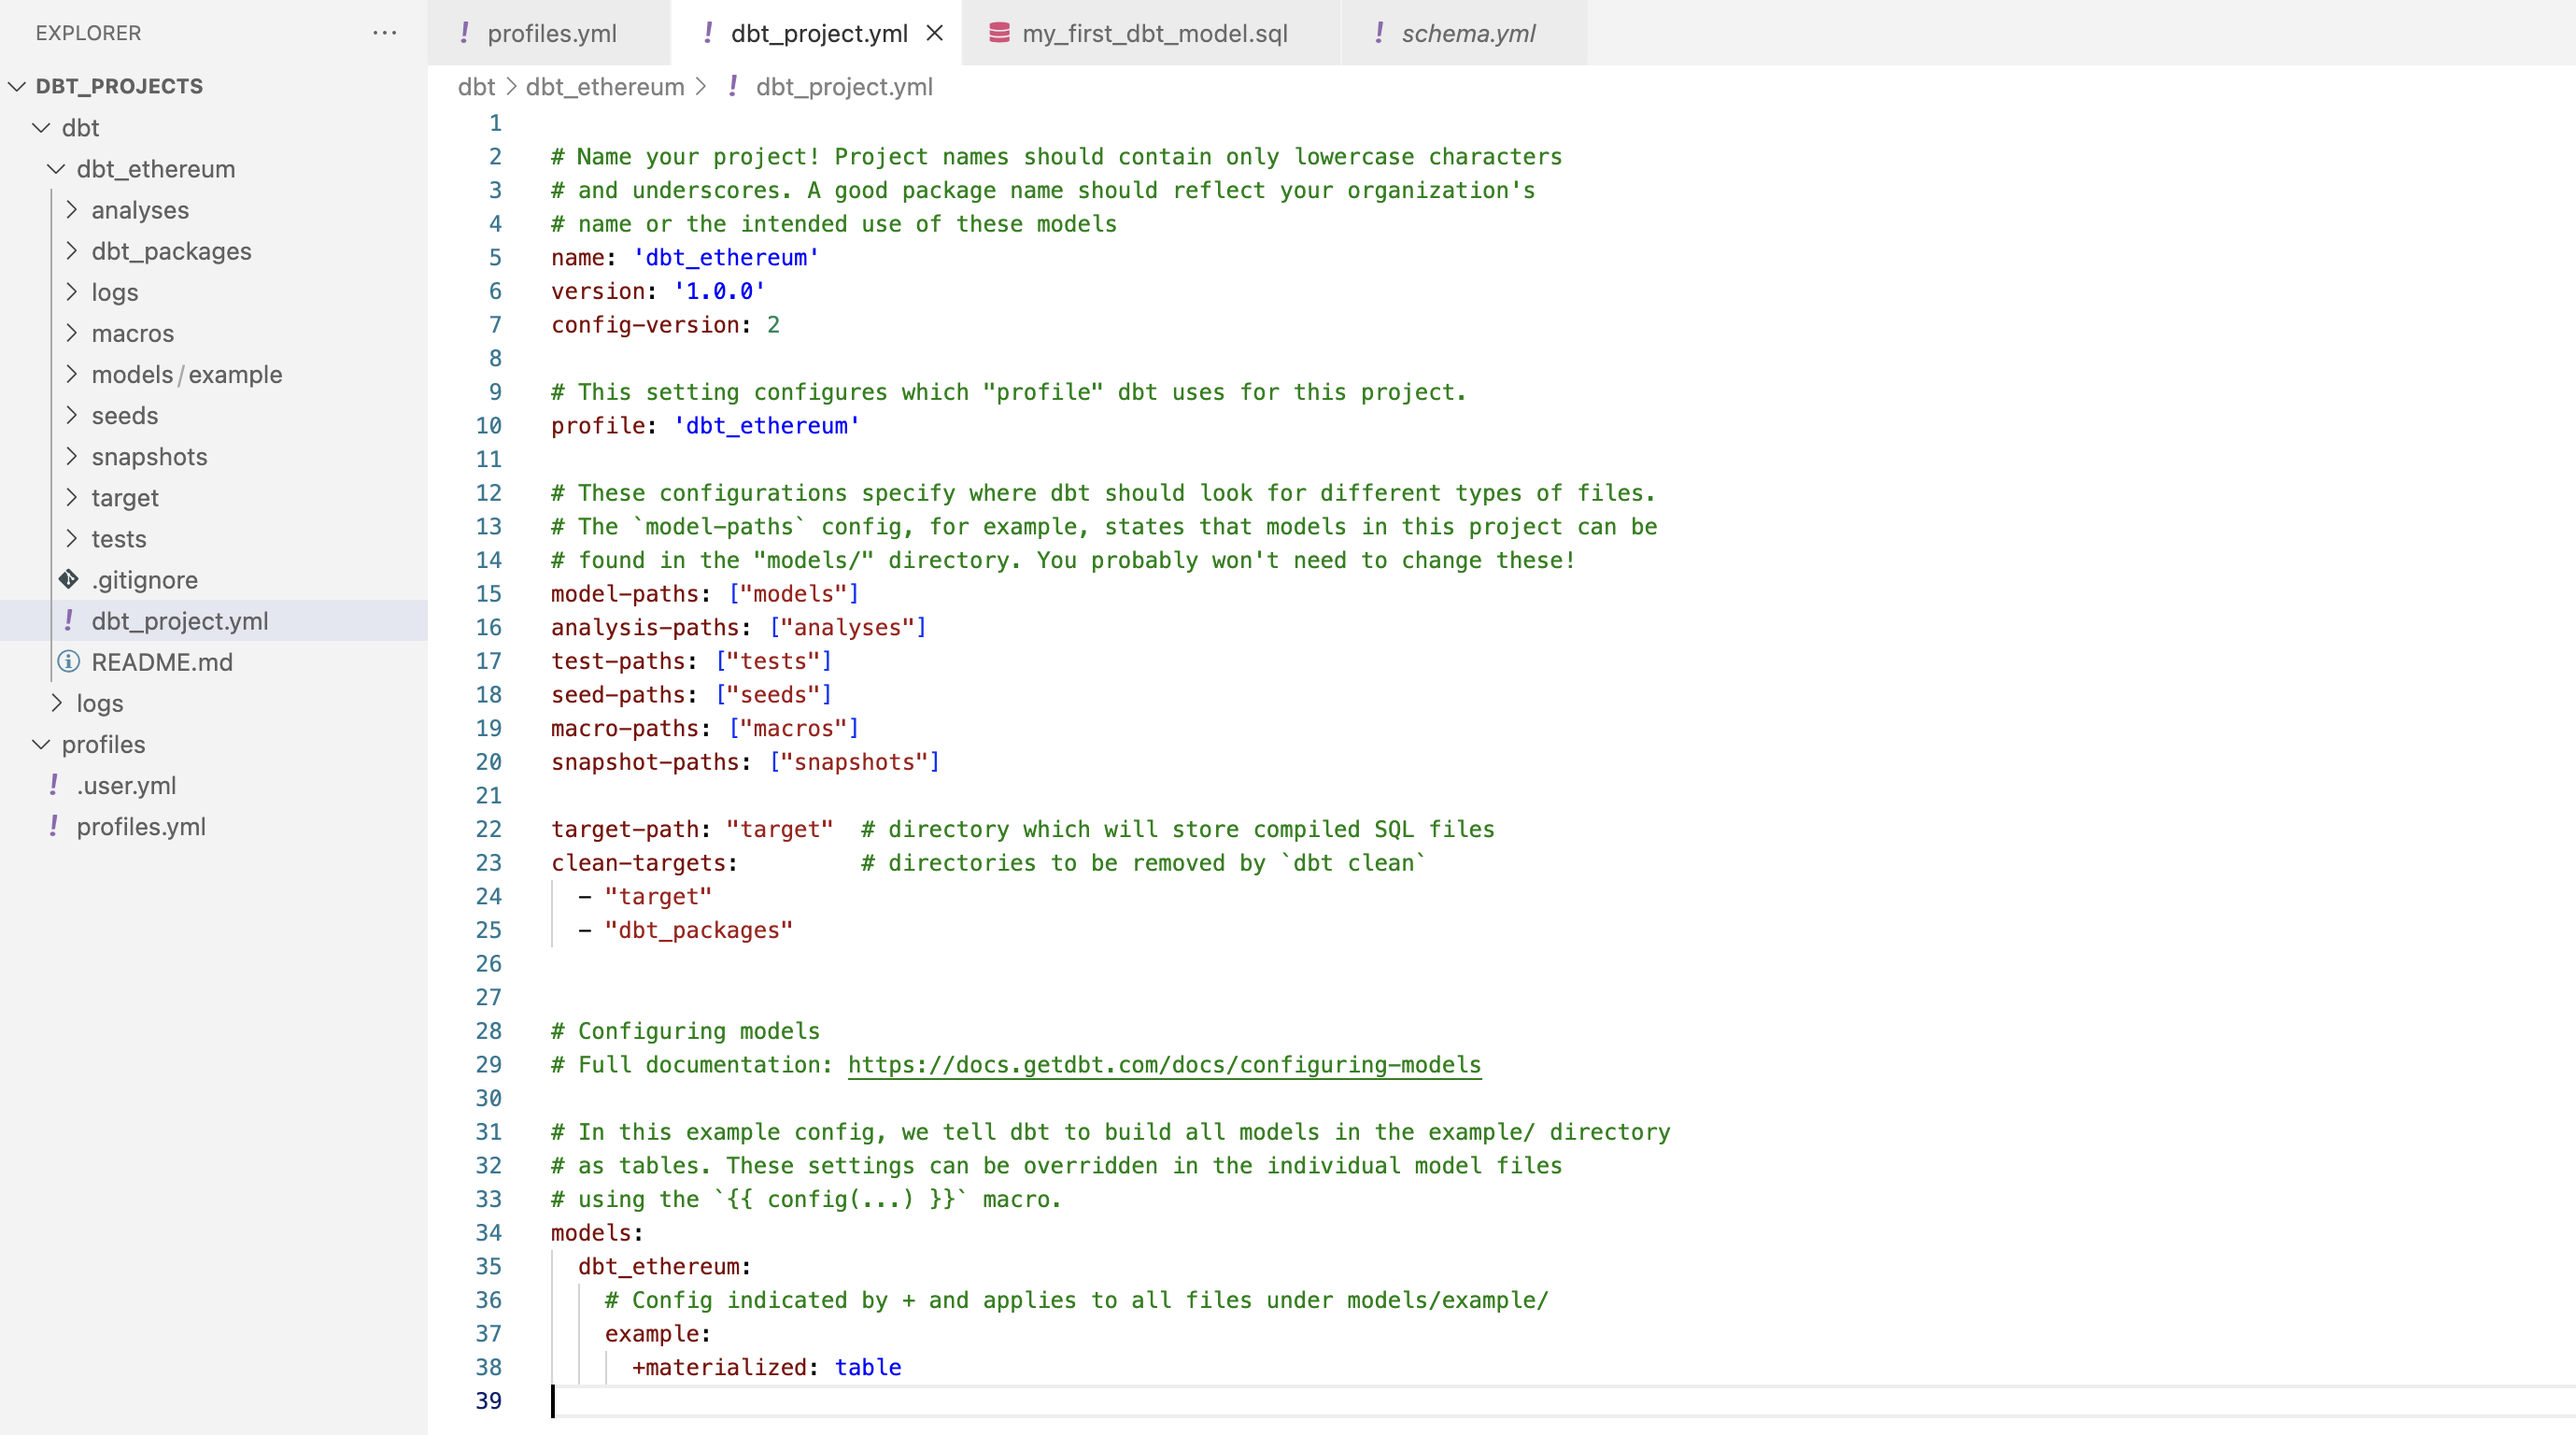
It’s worth noting that there are two example models included in the directory: my_first_dbt_model.sql and my_second_dbt_model.sql. While they don’t do much on their own, they’re a great way to ensure that we’re heading in the right direction and that everything is working as expected.
Running our dbt project
The next step is to try the docker equivalent of dbt run (for our newly created project):
docker run -it \
--platform linux/amd64 \
--network=host \
--mount type=bind,source=/Users/leodonethat/dbt_projects,target=/usr/app \
--mount type=bind,source=/Users/leodonethat/dbt_projects/profiles/,target=/root/.dbt/ \
ghcr.io/dbt-labs/dbt-postgres \
run --project-dir /usr/app/dbt/dbt_ethereum
11:18:06  Running with dbt=1.2.3
11:18:06  Partial parse save file not found. Starting full parse.
11:18:10  Found 2 models, 4 tests, 0 snapshots, 0 analyses, 256 macros, 0 operations, 0 seed files, 0 sources, 0 exposures, 0 metrics
11:18:10
11:18:11  Concurrency: 1 threads (target='dev')
11:18:11
11:18:11  1 of 2 START table model dbt.my_first_dbt_model ................................ [RUN]
11:18:11  1 of 2 OK created table model dbt.my_first_dbt_model ........................... [SELECT 2 in 0.58s]
11:18:11  2 of 2 START table model dbt.my_second_dbt_model ............................... [RUN]
11:18:12  2 of 2 OK created table model dbt.my_second_dbt_model .......................... [SELECT 1 in 0.23s]
11:18:12
11:18:12  Finished running 2 table models in 0 hours 0 minutes and 1.75 seconds (1.75s).
11:18:12
11:18:12  Completed successfully
11:18:12
11:18:12  Done. PASS=2 WARN=0 ERROR=0 SKIP=0 TOTAL=2
Everything looks good!
If we go to postico to see what is in our postgres database we will two new tables in the dbt schema:

This is fantastic news! Our basic setup has been successful, and we can now move on to tackling more complex tasks.
Updating the logic
Our next task is transforming the raw data we extracted with Airbyte, and this is where dbt really shines!
Understanding data from Airbyte
Our first step is taking a look at the data we get from Airbyte

Each row has only three columns, where the field that really interests us is _airbyte_data. It’s a json string with the result of the eth_getBlockByNumber api call.
select _airbyte_data
from _airbyte_raw_ethereum_blocks
order by _airbyte_emitted_at asc
limit 1
{
  "hash": "0xd4e56740f876aef8c010b86a40d5f56745a118d0906a34e69aec8c0db1cb8fa3",
  "size": "0x21c",
  "miner": "0x0000000000000000000000000000000000000000",
  "nonce": "0x0000000000000042",
  "number": "0x0",
  "uncles": [
  ],
  "gasUsed": "0x0",
  "mixHash": "0x0000000000000000000000000000000000000000000000000000000000000000",
  "gasLimit": "0x1388",
  "extraData": "0x11bbe8db4e347b4e8c937c1c8370e4b5ed33adb3db69cbdb7a38e1e50b1b82fa",
  "logsBloom": "0x00000000000000000000000000000000000000000000000000000000000000000000000000000000000000000000000000000000000000000000000000000000000000000000000000000000000000000000000000000000000000000000000000000000000000000000000000000000000000000000000000000000000000000000000000000000000000000000000000000000000000000000000000000000000000000000000000000000000000000000000000000000000000000000000000000000000000000000000000000000000000000000000000000000000000000000000000000000000000000000000000000000000000000000000000000000",
  "stateRoot": "0xd7f8974fb5ac78d9ac099b9ad5018bedc2ce0a72dad1827a1709da30580f0544",
  "timestamp": "0x0",
  "difficulty": "0x400000000",
  "parentHash": "0x0000000000000000000000000000000000000000000000000000000000000000",
  "sha3Uncles": "0x1dcc4de8dec75d7aab85b567b6ccd41ad312451b948a7413f0a142fd40d49347",
  "receiptsRoot": "0x56e81f171bcc55a6ff8345e692c0f86e5b48e01b996cadc001622fb5e363b421",
  "transactions": [
  ],
  "totalDifficulty": "0x400000000",
  "transactionsRoot": "0x56e81f171bcc55a6ff8345e692c0f86e5b48e01b996cadc001622fb5e363b421"
}
Transforming data from Airbyte
Let’s move on to the next step in our dbt project, which may be small, but is certainly significant! Our goal is to create a table called blocks from the json results in _airbyte_data. Additionally, we will be adding an extra field at the end that shows the number of transactions within each block.
It’s important to note that the operator -> returns a json object, while ->> returns a string.
To achieve this, we will create a new file called blocks.sql in the models directory.
with
blocks as (
    select
        _airbyte_data ->> 'number' as number,
        _airbyte_data ->> 'hash' as hash,
        _airbyte_data ->> 'parentHash' as parentHash,
        _airbyte_data ->> 'nonce' as nonce,
        _airbyte_data ->> 'sha3Uncles' as sha3Uncles,
        _airbyte_data ->> 'logsBloom' as logsBloom,
        _airbyte_data ->> 'transactionsRoot' as transactionsRoot,
        _airbyte_data ->> 'stateRoot' as stateRoot,
        _airbyte_data ->> 'receiptsRoot' as receiptsRoot,
        _airbyte_data ->> 'miner' as miner,
        _airbyte_data ->> 'difficulty' as difficulty,
        _airbyte_data ->> 'totalDifficulty' as totalDifficulty,
        _airbyte_data ->> 'extraData' as extraData,
        _airbyte_data ->> 'size' as size,
        _airbyte_data ->> 'gasLimit' as gasLimit,
        _airbyte_data ->> 'gasUsed' as gasUsed,
        _airbyte_data ->> 'mixHash' as mixHash,
        _airbyte_data ->> 'timestamp' as timestamp,
        _airbyte_data ->> 'uncles' as uncles,
        _airbyte_data ->> 'transactions' as transactions,
        json_array_length((_airbyte_data ->> 'transactions')::json) as numberTransactions
    from
        _airbyte_raw_ethereum_blocks
)
select
    *
from
    blocks
Once we run dbt again, the dbt.blocks table should now be available in our Postgres database!
In order to keep the momentum going, our next step will be to add a new model called transactions. This model will involve unpacking the data that we previously extracted and transformed in the blocks table.
with
blocks_transactions as (
    select
        json_array_elements(transactions::json) as transaction
    from
        {{ ref('blocks') }}
),
transactions as (
    select
        transaction ->> 'r' as r,
        transaction ->> 's' as s,
        transaction ->> 'v' as v,
        transaction ->> 'to' as to,
        transaction ->> 'gas' as gas,
        transaction ->> 'from' as from,
        transaction ->> 'hash' as hash,
        transaction ->> 'type' as type,
        transaction ->> 'input' as input,
        transaction ->> 'nonce' as nonce,
        transaction ->> 'value' as value,
        transaction ->> 'chainId' as chainId,
        transaction ->> 'gasPrice' as gasPrice,
        transaction ->> 'blockHash' as blockHash,
        transaction ->> 'blockNumber' as blockNumber,
        transaction ->> 'transactionIndex' as transactionIndex
    from
        blocks_transactions
)
select
    *
from
    transactions
This particular step introduces two new pieces of information. Firstly, we will be using the json_array_elements function which is capable of breaking down each element within a json array into its own individual row. Additionally, we will also be referencing the blocks model, which is our first instance of dbt syntax.
To proceed, we will delete any existing example models and initiate a full refresh of our dbt project. We can use the same docker command as before, but with a modified final part:
run --full-refresh --project-dir /usr/app/dbt/dbt_ethereum
06:44:57  Running with dbt=1.2.3
06:44:57  Found 2 models, 6 tests, 0 snapshots, 0 analyses, 256 macros, 0 operations, 0 seed files, 0 sources, 0 exposures, 0 metrics
06:44:57
06:44:58  Concurrency: 1 threads (target='dev')
06:44:58
06:44:58  1 of 2 START table model dbt.blocks ............................................ [RUN]
06:44:59  1 of 2 OK created table model dbt.blocks ....................................... [SELECT 10 in 0.69s]
06:44:59  2 of 2 START table model dbt.transactions ...................................... [RUN]
06:44:59  2 of 2 OK created table model dbt.transactions ................................. [SELECT 499 in 0.40s]
06:44:59
06:44:59  Finished running 2 table models in 0 hours 0 minutes and 1.88 seconds (1.88s).
06:44:59
06:44:59  Completed successfully
06:44:59
06:44:59  Done. PASS=2 WARN=0 ERROR=0 SKIP=0 TOTAL=2
Writing our first data-shaping transformation
We now have a neatly organized table containing all the blockchain transactions. With this data, we can explore various avenues of analysis and let our creativity run wild.
To take the first step in that direction, our next task will be to create a transformation that can calculate daily aggregations for the number of transactions, as well as their total value.
It’s important to note that we will be using a custom user-defined function called hex_to_num to simplify conversions. Although this function could have been used in previous transformations, we will keep the code as straightforward as possible for the purpose of this proof of concept.
select
    date(date_trunc('day', to_timestamp(hex_to_num(blk.timestamp)))) as date_ymd,
    count(distinct tx.hash) as number_transactions,
    count(distinct tx.blockNumber) as number_blocks,
    sum(hex_to_num(value)) as total_value_wei,
    sum(hex_to_num(value) * (1/pow(10,18))) as total_value_eth
from
    {{ ref('transactions') }}  as tx
    left join {{ ref('blocks') }} as blk on (tx.blocknumber = blk.number)
group by
    date_ymd
To proceed, we will run the docker version of dbt run once more. Once the process is complete, we can take a quick glance at our database by running a simple query.
select *
from dbt.transactions_value_daily
order by date_ymd asc
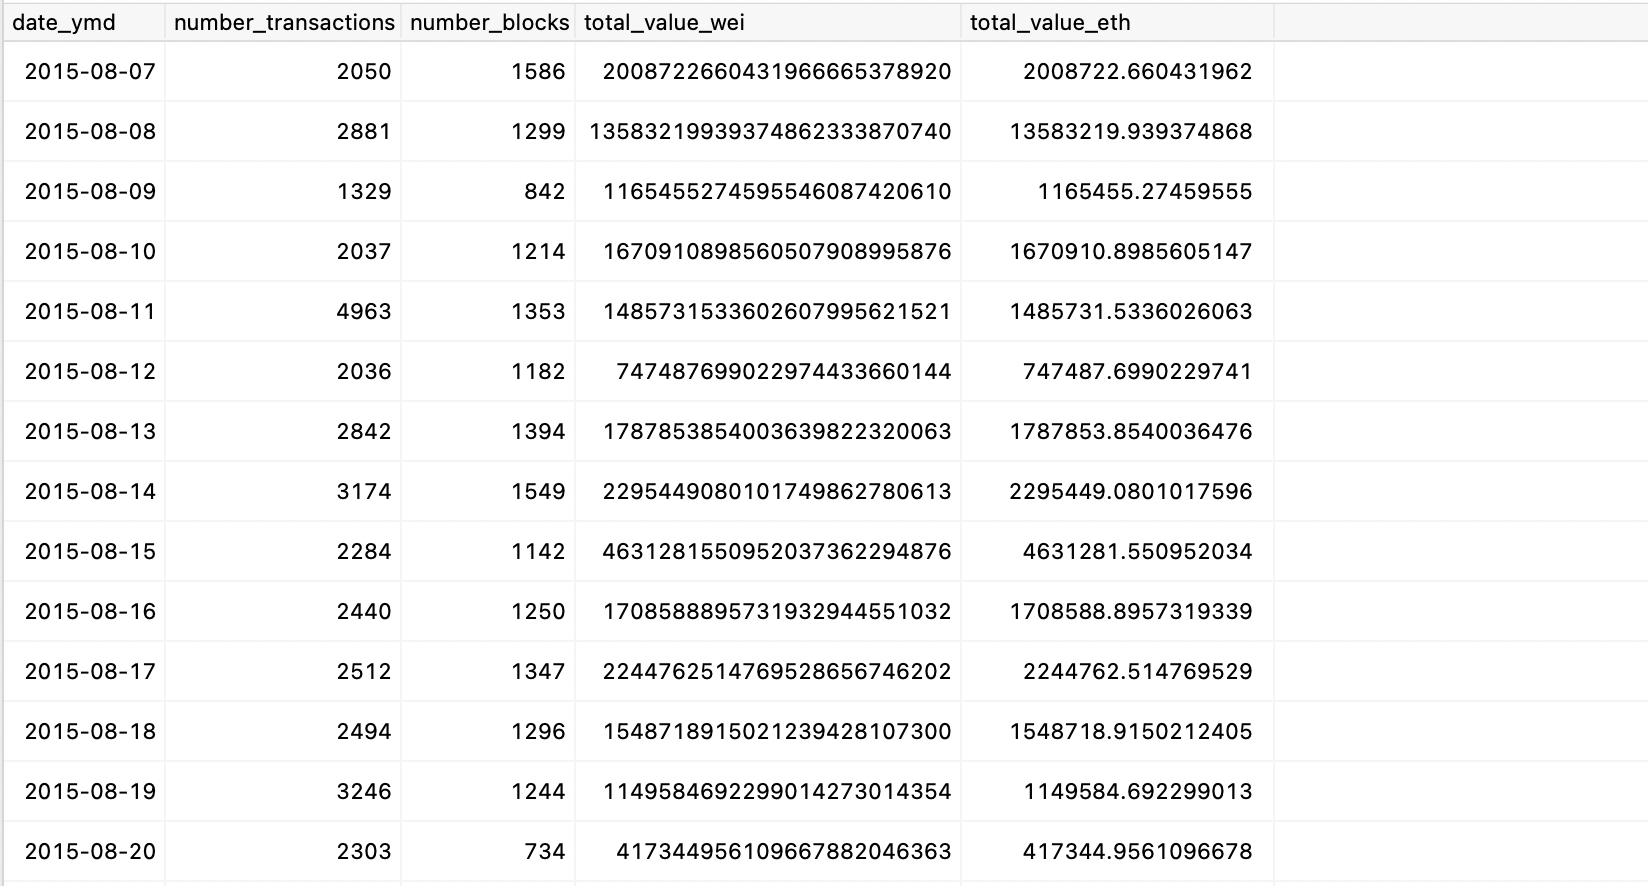
Fantastic! 🚀
We can now easily visualize the table with the required data. We have multiple options to access this table, such as using JupyterHub for data analysis via notebooks or using Metabase, a visualization tool, to create interactive dashboards.
It’s important to note that for this proof of concept, we assumed the underlying data is static and processed all of it at once. This approach is suitable for analytical purposes when we want to study past behavior. However, it doesn’t provide the complete picture of a blockchain. To productionize this pipeline, we need to process new blocks efficiently. This involves setting up Airbyte to extract blocks from where it previously stopped and updating our dbt models to process new data incrementally.